

How to do minor paint repairs on a car yourself
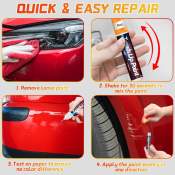
Every car owner knows the feeling: you're washing your car and suddenly notice a new scratch on the door or a stone chip on the hood. It's a frustrating moment that often ruins the mood. These small blemishes are not only aesthetically unsightly, but over time they can develop into more serious problems, such as rust that spreads under the paint and irreparably damages the body panels.
The first thought is often to turn to a professional paint shop. While this will ensure a top-notch result, repainting even a small detail can cost hundreds of euros. Fortunately, many minor damages – superficial scratches, scuff marks and small stone chips – can be repaired at home with a little time, patience and the right tools.
This guide is designed to give you the knowledge and confidence to do your own car paint repair. We're not talking about repainting an entire car or a large dent from an accident, but rather those everyday "battle scars" that can be successfully hidden in a garage or backyard. A properly performed repair will not only improve the appearance of your car, but also protect it from the elements and maintain the value of the vehicle.
Chapter 1: Anatomy of Car Paint – Understanding What You’re Doing
Before you grab the sandpaper or the paint bottle, it's critically important to understand how a modern car's paint job is structured. It's not just one layer of paint on metal. Most modern cars are finished with a multi-layer system called a "basecoat/clearcoat" system, although in reality there are more layers.
Understanding which layer the damage is located in completely determines the repair method.
1. substrate: this is the material of the car body – usually sheet steel, aluminum or plastic (for example, on the bumpers).
2. primer: the first coat applied directly to the substrate. The purpose of the primer is to protect the metal from corrosion and ensure strong adhesion of subsequent paint layers. The primer is often gray, white, or black.
3. Basecoat: This is the layer that gives the car its actual color and effect (such as metallic or pearlescent). The basecoat layer is surprisingly thin and, without protection, is very susceptible to environmental influences. It is important to know that basecoat is usually matte until it is covered with varnish.
4. Clearcoat: The top, transparent layer. This is the car's "shield." Clearcoat adds depth and shine to the paint, but its main function is to protect the base paint from UV rays, scratches, acid rain, bird droppings, and other chemicals. Clearcoat is the thickest of the three, but still only about the thickness of a hair.
Most everyday scratches are limited to the paint layer. These are the easiest to repair. Once the scratch has penetrated the paint and reached the base color, the repair is more difficult. However, if the damage has penetrated all layers and exposed the primer or even the bare metal, quick action is essential to prevent rust.

Chapter 2: Damage Assessment – Can I Do It Myself?
The most important step is diagnosis. A correct diagnosis saves time and money and prevents you from making things worse.
"nail test"
The easiest and most common way to assess the depth of a scratch is the so-called nail test. Carefully slide your fingernail across the scratch.
Scenario A: The nail doesn't get stuck behind the scratch. If you can barely feel the scratch or not at all, it's a very superficial damage that's only on the top layer of paint. These scratches often appear as light or white lines on a dark car. The good news: they're easiest to remove by polishing. Painting is probably not necessary.
Scenario B: The nail is noticeably stuck behind the scratch. This indicates that the scratch is deeper, likely going through a significant portion of the varnish layer. Solution: Depending on the depth, more aggressive polishing may be sufficient, but sanding (wet sanding) and subsequent polishing are often necessary.
Scenario C: You see a different color at the bottom of the scratch. If the car is blue but the bottom of the scratch is white or gray, you have reached the primer stage. If you see shiny metal or even slightly brownish rust, it is more serious. Solution: Polishing will not help here. You need to fill the damage with new paint, or paint touch-up. This requires more skill and special tools.
When to call a professional? If the damage is large (for example, the entire door is scratched with a key), if the metal is dented, or if the rust has already penetrated the paint and caused "bubbles", home repair is very difficult and the result may not be satisfactory. Also, spot repair of complex three-layer pearlescent paints is a very big challenge for a beginner.
Chapter 3: The necessary arsenal – tools and materials
You need the right tools to do a successful job. Don't try to replace specialty products with household chemicals. Here's a list of things you might want to stock up on, depending on the nature of the job:
for cleaning and preparation:
car shampoo and wash mitt .
Silicone remover or isopropyl alcohol (IPA) – for degreasing surfaces.
high-quality microfiber cloths (have several of them).
Masking tape (high quality, does not leave adhesive marks).
for superficial scratches (polishing):
scratch remover or abrasive polishing compound.
finishing paste (polish) to restore shine.
polishing pad (for manual use) or polishing machine with appropriate discs .
for deeper nicks and scratches (painting):
Correct shade of paint: This is critical. Find the exact paint code from your car's VIN or body plate. Paint touch-up kits are often sold in small bottles with a brush inside the cap (like nail polish), or in aerosol cans. For precision work, a bottle is better.
Primer (if necessary): if the metal is bare, a fine brush is suitable for applying it to the cracks.
Clearcoat : If you use a two-coat system, you will definitely need a separate clearcoat to protect the base color and provide shine.
very fine art brushes or toothpicks/matches: the brushes that come with the kit are often too big and cumbersome for small marks.
Wet sandpaper : grits p1500, p2000, p2500 and p3000. These are used to smooth out the repair area.
- Sanding block : a small, hard block (such as the size of a school eraser) to sand only the raised area, not the surrounding entire varnish.

car refinishing paint in a spray bottle
Chapter 4: Preparation is half the battle
Before you start, make sure the environment is suitable. The ideal place is a garage that is free of dust, well-lit and has a moderate temperature (around 15-25 degrees Celsius). Avoid working in direct sunlight or in very humid weather, as this will affect the drying and effectiveness of the chemicals.
Step 1: Thorough wash. Wash the area to be repaired and the surrounding area thoroughly with car shampoo to remove any loose dirt, sand and grime. Dry the surface completely.
Step 2: Degrease. This is a step that is often ignored by beginners, but it is crucial. Even surfaces that appear clean may have wax, silicone or oil residue that will prevent the new paint from adhering. Wipe the area with a microfiber cloth dampened with silicone remover or isopropyl alcohol.
Step 3: Demarcation. If you plan to sand or use spray paint, cover the surrounding areas with masking tape and paper to prevent accidental damage or paint mist from getting into unwanted areas.
Work instruction a: removing superficial paint scratches by polishing
If your "nail test" shows that the scratch is superficial (scenario a), then congratulations - this is the easiest fix. A superficial scratch is actually a v-shaped groove in the polish layer, the edges of which reflect light and make the scratch visible. The goal of polishing is to grind the polish surrounding the scratch down microscopically until the bottom of the scratch and the surrounding surface are flush.
1. Apply the paste: Place a small amount (about the size of a pea) of scratch remover or abrasive paste on a polishing pad or microfiber cloth.
2. Treat the area: Rub the scratched area in a circular or back and forth motion, applying moderate pressure. Do not rub dry on one area for too long as this will create heat.
3. Check the result: wipe off the paste residue with a clean cloth and inspect the result under the light of a flashlight. If the scratch is still visible, repeat the process. For deeper (but still internal) scratches, more force and patience may be required.
4. Finish with a gloss: Abrasive paste can leave a slight "haze" or micro-scratches on the surface. To remove these and restore the mirror shine, repeat the process with a finer finishing paste (polish).
5. Protection: After polishing, any protective wax has been removed from the area. Be sure to apply a new coat of car wax or sealant to the area.

Work instructions b: deeper scratches and stone chips – paint repair
This method is necessary if the damage has penetrated the varnish and reached the base paint or primer (scenarios b and c). The goal is to fill the "hole" with new paint and then level it with the surrounding surface.
NB! This process requires patience. Don't rush the drying between layers.
stone chips in focus
Stone chips are small craters in the paint coating that often have sharp, loose edges.
1. Clean the crater: Use a fine needle or fiberglass pen to scrape loose dirt, old wax, and loose paint edges from the dent. Be careful not to widen the damage. Clean the area again with a degreaser.
2. Priming (if necessary): If you see green metal at the bottom of the crater, first apply a drop of primer with a very fine brush or the tip of a toothpick. Let it dry completely (see manufacturer's instructions, usually at least 30-60 minutes).
3. Applying the base color : Shake your paint bottle thoroughly (at least 2 minutes) to mix the metallic particles evenly. Apply the paint by "dabbing" it into the stain, not brushing it. Use a very fine tool - a toothpick, a matchstick or a special microbrush.
Tip: The goal is to apply several thin coats, not one thick coat. Let each coat dry (about 20-30 minutes). Fill the crack until the paint level is slightly below the surrounding varnish surface.
4. Apply the varnish : Once the base coat has completely dried (preferably a few hours or overnight), it is time to apply the varnish. Apply the varnish in the same way, dabbing. The varnish should fill the crater so that a small "pile" or "bubble" is created, which is slightly higher than the surrounding surface. This is necessary because the varnish shrinks as it dries and we need material to sand down later.
5. Drying: Let the varnish dry for at least 24 hours, ideally 48 hours. It must be completely hard before sanding.
finishing – smoothing and polishing
This is the step that separates a novice "spotty" repair from a professional result. If you've just put paint in a spot, that spot will be uneven and will stand out in the light. The goal is to sand the "pile" of varnish we've created completely flush with the surrounding original varnish.
1. Preparation for sanding: Soak wet sandpaper (p2000, p2500, p3000) in water for at least 15 minutes. Wrap the p2000 paper around a small hard sanding block.
2. Wet sanding: Spray water on the repair area as a lubricant. Carefully start sanding only the varnish layer, keeping the block completely flat. Move the block in short, straight strokes, not in circles.
Critical point: Check your progress frequently by wiping the surface dry. You will see that the nail polish clump becomes matte, while the surrounding polish is still shiny. Your goal is to sand only until the matte area expands and becomes even with the surrounding surface. Avoid over-sanding so as not to wear down the surrounding original polish!
3. Move to finer grit: When the pile is almost flat, switch to p2500 and finally p3000 to remove the coarser scratches from the previous paper and make the surface smoother.
4. Restore gloss: You now have a repair area that is perfectly smooth to the touch, but dull and hazy (from sanding marks). Now use an abrasive polishing compound and pad (as described in work instructions a) to remove sanding marks and restore high gloss. Finish with a finishing compound.

Chapter 5: Common Mistakes to Avoid
Even with the best intentions, things can go wrong. Here are some typical stumbling blocks:
wrong color tone: even a small difference in tone will stand out in the repaired area. don't trust "universal" colors, always use the code. also consider that the old car's paint may have faded in the sun and the new color may look a little brighter.
too much paint at once: thick coats of paint take a long time to dry, can start to run, and create bubbles that later crack. Patience and thin coats are the key.
Insufficient cleaning: If paint is applied to a black or greasy surface, it will soon peel off.
Over-sanding: The biggest fear – sanding through the varnish to the base coat or primer where it wasn’t needed. Always use a block and check often.
Rushing: color correction is not a 15-minute job. Allow time for the layers to dry.
in conclusion
Doing your own car paintwork is a skill that takes practice. Your first attempt may not be perfect, and that's perfectly normal. Start in an inconspicuous area, such as the bottom edge of a door, to get the feel.
It is important to remember that the goal of home repair is not always to achieve factory perfection, but to make the damage invisible to the eye from a distance of half a meter and protect the body from corrosion.
Once you have successfully completed the process, you are guaranteed to be satisfied with the work you have done yourself. You have also saved a significant amount of money and contributed to extending the life of your car. Get to work!
 The data shown here, especially the complete database of car spare parts, may not be copied. It is strictly prohibited to duplicate the data and database and distribute the same, and/or instruct third parties to engage in such activities, without prior consent from TecAlliance. Any use of content in a manner not expressly authorized constitutes copyright infringement and violators will be prosecuted.