

How to replace Cylinder head cover gasket
Valve Cover Gasket Replacement: A Detailed Guide (8 Steps)
Replacing the valve cover gasket (often simply called the valve cover gasket) is a critical maintenance task that helps prevent oil leaks from the engine. Proper installation ensures a long gasket lifespan and helps avoid engine damage. Follow these eight steps to ensure the job is done correctly.
Preparation and Removal of the Old Gasket
Choose the Correct Gasket: Select a new valve cover gasket that matches your vehicle’s model and engine type.
 Image. An oil-leaking engine valve cover gasket.
Remove the Old Gasket and Clean the Surfaces
- First, remove the valve cover along with its bolts and grommets (if present), then remove the valve cover gasket. To remove the gasket, we recommend using a gasket remover. This product is a “secret weapon” that many DIY mechanics are not aware of. Why is it so useful? Old gaskets are often hardened and baked onto the surface. If you try to scrape them off with a knife or screwdriver, you risk scratching the soft aluminum cylinder head. A scratched cover = a new oil leak. How it works: apply the product to the old gasket, wait 10–15 minutes, and the gasket softens into a paste that can easily be wiped away with a cloth or removed using a plastic scraper.
- Cleaning Is Critical: Thoroughly clean the sealing surfaces of both the valve cover and the cylinder head. Remove oil and cleaning residues from the bolt holes as well. For cleaning, you can use a brake cleaner, for example. Brake cleaner removes oil and grease within seconds and evaporates completely, leaving the surface perfectly dry and clean. Unlike gasoline or solvents, it does not leave an oily film.
- Make sure the gasket grooves in the cover are clean and dry. Remove all old sealing material—new gaskets must always be installed on a clean and dry surface.
Inspect the Valve Cover for Damage
-
Plastic cover: Check the cover for cracks and deformation.
-
Steel cover: Ensure that the flanges are straight.
-
Cast iron cover: Inspect the cover and make sure it is straight and has no damaged or cracked areas.
- Note: If the valve cover is damaged, it must be replaced before installing a new gasket.
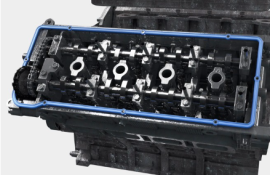
 Image. The valve cover has been removed.
Installation of Gaskets and Grommets
The gasket design determines which of the following steps you need to perform:
Replace the Spark Plug Tube Seals:
- Some valve covers use spark plug tube seals, which must always be replaced together with the valve cover gasket. This prevents oil from entering the spark plug tubes, which could cause engine misfires.
- Carefully remove the old seal, paying attention to the direction of the sealing lip. An incorrectly installed seal may prevent the cover from seating properly.
- During installation, the seal may either be pressed into place by hand (press-fit design) or installed using a seal driver/socket to ensure it is seated correctly.

Image. Spark plug seal.
Spark Plug Tube Seals – What Are They?In most modern engines (DOHC engines with dual overhead camshafts), the spark plugs are located in deep “wells” or tubes that pass through the valve cover. Because a large amount of engine oil splashes around inside the valve cover while the engine is running, a seal is needed to prevent oil from flowing into the spark plug well where the spark plug sits.
Two Main Types
- Integrated: On some vehicles, these seals are integrated into the main valve cover gasket.
- Separate Rings (Most Common): On many vehicles (for example older Honda, Toyota, Nissan, BMW models), these are completely separate round rubber rings. They resemble a thick O-ring or an oil seal. These seals are pressed into dedicated recesses on the inside of the valve cover.
What Happens If You Don’t Replace the Spark Plug Tube Seals? If you replace only the outer valve cover gasket and leave the old (hardened) spark plug tube seals in place, oil will begin to leak into the spark plug wells.
- Result: The spark plug becomes submerged in oil → the ignition coil boot absorbs oil → an electrical short occurs → the engine starts to misfire and run poorly.
Install the Valve Cover Gasket: Install the new valve cover gasket by carefully pressing it into its grooves and seating it properly in place.
Replace the Bolt Grommets (If Required):
- Some valve covers use rubber seals/grommets around the bolt holes. These must always be replaced to ensure proper sealing.
- Clamp the bolt head gently in a vise, remove the old grommet using a small screwdriver, and slide the new grommet onto the bolt.
- Reinstall the bolts/grommets into the valve cover.
Final Installation and Tightening
Use a Small Amount of RTV Silicone Sealant if Required:
- Some valve covers require a small amount of RTV silicone sealant at the 90° corners of the camshaft bearing surfaces or where the gasket meets other cast components (such as the intake manifold or timing cover).
- The need for RTV depends on the valve cover gasket design and the manufacturer’s instructions. Use RTV sparingly to prevent excess sealant from entering the engine’s oil circulation system.
Install the Valve Cover:
- Carefully position and install the valve cover. If spark plug tube openings are present, a small screwdriver may be needed to help guide the cover into place.
- Tightening: Always follow the manufacturer’s specified torque values and tightening sequence for the mounting bolts. If no sequence is provided, tighten the bolts gradually from the center outward.
 Image. Installing a new valve cover gasket.
Image. New valve cover gasket.
Attention! Model-Specific Differences
Before starting the job, check the specific requirements of your vehicle model. For example, on certain BMW engines it is mandatory to replace the bolts as well (aluminum bolts). On many diesel engines, gasket replacement requires removal of the fuel injectors, and on VAG Group vehicles it is often necessary to replace the camshaft adjuster (camshaft tensioner) gasket as well.
Although the general principle (remove bolts → replace gasket → tighten bolts) is the same, some vehicles have critical details that, if overlooked, can cause a DIY repair to go wrong.
Here is a list of the most common model-specific differences and typical mistakes:
1. BMW (N-Series Engines and Aluminum Bolts)
This is the most well-known “trap.” Many BMW gasoline engines (such as BMW N52, N54, N55 – commonly found in the E60, E90, and F10) use a magnesium alloy engine block and therefore aluminum bolts.
- Specific detail: Aluminum bolts are single-use only. They stretch when tightened.
- Risk: If a DIY mechanic reinstalls the old bolts, they can snap off inside the engine block. If steel bolts are used instead, galvanic corrosion can occur, damaging the engine block.
- Recommendation: When working on BMW engines, always purchase a gasket kit that includes new bolts.
2. Audi / Volkswagen (Timing Chain Tensioner “Half-Moon”)
On Audi / Volkswagen (VAG Group) 1.8T and 2.0 TFSI gasoline engines, oil often leaks from the rear of the engine where the camshaft timing chain is located.
- Specific detail: The gasket kit includes a small rubber or metal “half-moon” seal and a flat gasket that sits under the timing chain tensioner.
- Risk: People replace the main valve cover gasket but leave the small tensioner seal unchanged (because it is more difficult to access and requires a special tool to lift the tensioner).
- Result: the oil leak continues and oil fumes enter the cabin.
3. Diesel Engines (Injectors Through the Valve Cover)
On many modern diesel engines (for example 1.6 HDI / TDCi used by Peugeot, Citroën, Ford, Volvo, Mazda), the fuel injectors pass directly through the valve cover.
- Specific detail: To remove the valve cover, all injectors must first be pulled out.
- Risk: Injectors are often seized or oxidized in their seats. In a home garage, you may find that you cannot remove the cover at all or you may damage an injector. In addition, when reinstalling the injectors, the injector sealing washers (fireproof copper washers) and O-rings must always be replaced.
4. Subaru (Boxer Engine)
Subaru engines are flat (boxer-type), with the cylinders positioned horizontally on the sides of the engine bay.
- Specific detail: The valve covers are located only a few centimeters away from the vehicle body or subframe.
- Risk: Access is extremely limited. Often, the engine mounts must be loosened and the engine lifted or shifted using a jack just to remove the valve cover. This requires significantly more time and patience compared to an inline engine.
5. Sealant (RTV Silicone) Use at the Corners
This applies to about 90% of vehicles and is the number one mistake people make.
- Rule: Wherever the cylinder head meets an end cover (such as the timing cover or VANOS housing), a small step or gap is formed.
- What to do: At these corners (usually 2 or 4 locations), apply a pea-sized dab of high-temperature silicone sealant before installing the new gasket. If this is not done, the new gasket will start leaking from these corners almost immediately.
You can buy the correct new valve cover gasket for your vehicle here.
Here you can find gasket removal tools.
 The data shown here, especially the complete database of car spare parts, may not be copied. It is strictly prohibited to duplicate the data and database and distribute the same, and/or instruct third parties to engage in such activities, without prior consent from TecAlliance. Any use of content in a manner not expressly authorized constitutes copyright infringement and violators will be prosecuted.